How to work with xml envelope in orchestration
This project shows how to use an envelope to wrap multiple input xml files.
Create new schemas
Create one schema for the input xml file and one for the envelope to wrap the message(s).

1. Create a new schema for the input xml file (ex. Person).
2. Create another new schema for the envelope. (ex. PersonsEnv)
3. In the envelope schema, extra field can be added. (ex. Field).

4. In the properties of the envelope schema, set the following properties:
Envelope=YESElementFormDefault=Qualified
5. Create a body element in the envelope schema to store the payload data. In this sample, I renamed the root node to Envelope and the body element that store the payload data called Body.
6. Set the Data Structure Type of the body element (ex: Body) to xs:anyType – this allows the element to be able to store any type of the payload data file.

7. Click on the Body XPath in the properties of the root node (ex. Envelope) and then select the Body element that you’ve created earlier – this is to indicate where the payload data is stored.
Create send pipeline
1. Create a new send pipeline and drop an XML Assembler into the Assemble stage.
2. Click on the XML assembler and set the following properties:
Add processing instructions = AppendDocument schemas = select the schema of the payload (ex. Person)Envelope schemas = select the schema of the envelope (ex. PersonsEnv)

Create orchestration
1. Create a new orchestration.


| Message/variable | Identifier | Type | Comments |
| Message | msgAggregatePerson | System.xml.xmldocument | Outgoing message |
| Message | msgRcvPerson | Append_Project.Person | Incoming message |
| Message | msgNxtPerson | Append_Project.Person | Next incoming message |
| Variable | MessageToAggregate | Microsoft.XLANGs.Pipeline.SendPipelineInputMessages | Aggregated message(s) |
| Variable | vNxtMsg | System.Boolean | Looping condition |
In the MessageToAggregate expression shape:
MessageToAggregate.Add(msgRcvPerson);
In the NxtMessageToAggregate expression shape:
MessageToAggregate.Add(msgNxtPerson);
In the Construct_AggregateMessage shape:
MessageType = msgAggregate
msgAggregatePerson = new System.Xml.XmlDocument();
Microsoft.XLANGs.Pipeline.XLANGPipelineManager.ExecuteSendPipeline(typeof Append_Project.XMLAggregating),MessageToAggregate,msgAggregatePerson);
One of the sample input : (create multiple xml files)
<?xml version="1.0"?>
<ns0:Person xmlns:ns0="http://Append_Project.Person">
   <ns0:No>123</ns0:No>
   <ns0:Name>test1</ns0:Name>
   <ns0:Gender>Male</ns0:Gender>
</ns0:Person>
Result of the sample output:
<?xml version="1.0" encoding="UTF-16"?>
<ns0:Envelope xmlns:ns0="http://Append_Project.PersonsEnv">
  <ns0:Field>ExtraField</ns0:Field>
  <ns0:Body>
    <ns0:Person xmlns:ns0="http://Append_Project.Person">
      <ns0:No>123</ns0:No>
      <ns0:Name>test1</ns0:Name>
      <ns0:Gender>Male</ns0:Gender>
    </ns0:Person>
    <ns0:Person xmlns:ns0="http://Append_Project.Person">
      <ns0:No>234</ns0:No>
      <ns0:Name>test2</ns0:Name>
      <ns0:Gender>Female</ns0:Gender>
    </ns0:Person>
    <ns0:Person xmlns:ns0="http://Append_Project.Person">
      <ns0:No>345</ns0:No>
      <ns0:Name>test3</ns0:Name>
      <ns0:Gender>Female</ns0:Gender>
    </ns0:Person>
  </ns0:Body>
</ns0:Envelope>
Part 5: Integration with SharePoint
Part 1 and 2 explained the installation and configuration. Part 3, we explained about creating the default SharePoint site and sub-sites, setting up the permission. Part 4 about posting a document to SharePoint site using BizTalk without any modification. This last part is to show on how to post a document to SharePoint using BizTalk’s orchestration and promote the content of the xml file to the list column(s).
BizTalk part
1. Create a new empty BizTalk project.
2. Add a new schema file

3. Promote the element(s) that you want it to be visible in the view of the SharePoint list.
4. Add a new orchestration.

| Message/variable | Identifier | Type | Comments |
| Message | msgInput | Sharepointintegration.Person | Incoming message |
| Message | msgOutput | Sharepointintegration.Person | Outgoing message |
| Receive port | ReceiveInput | Sharepointintegration.ReceiveInput_prtType | Specify later |
| Send port | SendOutput | Sharepointintegration.SendOutput_prtType | Specify later |
5. In the Message Assignment shape, set the following value:
msgOuput = msgInput;
6. Build and deploy the solution to BizTalk Admin Console.
7. In the BizTalk Server Administration, create a FILE receive port.
8. Create a new send port, select Windows SharePoint Services from the list. Set the Send Pipeline to XMLTransmit.
9. Click on Configure button.
- Adapter web service port:81
- User Client OM: Yes (default)
- Destination folder URL: PersonLibrary
- Overwrite: NO (default)
- SharePoint site URL:
http://<server name>:<port#>/sites/btshome/
In the Windows SharePoint Service Integration section, enter the following values.
| Field | Value | Remarks |
| Column 01 | PersonID | Column name that visible in the view of the sharepoint document library. |
| Column 01 Value | %XPATH=/*[local-name()='Person' and namespace-uri()='http://SharepointIntegration.Person']/*[local-name()='ID' and namespace-uri()='']% |
%XPATH=Instance XPathThe “Instance XPath” can be copy from the schema. |
| Column 02 | PersonName | Column name from the SharePoint document library. |
| Column 02 Value | %XPATH=/*[local-name()='Person' and namespace-uri()='http://SharepointIntegration.Person']/*[local-name()='Name' and namespace-uri()='']% |
|
| Column 03 | PersonAge | |
| Column 03 Value | %XPATH=/*[local-name()='Person' and namespace-uri()='http://SharepointIntegration.Person']/*[local-name()='Age' and namespace-uri()='']% |
|
| Column 04 | PersonGender | |
| Column 04 Value | %XPATH=/*[local-name()='Person' and namespace-uri()='http://SharepointIntegration.Person']/*[local-name()='Gender' and namespace-uri()='']% |
|
| Column 05 | PersonSkill | |
| Column 05 Value | %XPATH=/*[local-name()='Person' and namespace-uri()='http://SharepointIntegration.Person']/*[local-name()='Skill' and namespace-uri()='']% |
The Instance XPath can be copy from the schema file.
SharePoint part:
1. In the SharePoint site, create a new document library.
2. Click on Add list, libraries and other apps.
3. Click on Document library.
4. Click on Advanced Options on the Adding Document Library.
5. Enter Name, Description. Select None in the Document Template.
6. Click Create.
7. Click on the newly created document library.
8. Click on Library settings.
9. Scroll to the Column section.
10. Click on Create column. Create the following column with the corresponding values.
| Name | Type |
| PersonID | Single line of text |
| PersonName | Single line of text |
| PersonAge | Single line of text |
| PersonGender | Single line of text |
| PersonSkill | Single line of text |
The new column is also the one that is added to the send port of the BizTalk.
11. When the new columns are created, proceed on adding them to the view.
12. Scroll to the Views section and click on All Documents.
13. Add the newly created column(s) and re-order the displaying order of the column. Click OK to save the changes.
Testing
1. Start the BizTalk application from the BizTalk admin console.
2. Drop an xml file to the input folder.
When the posting process working correctly, the document will be now visible in the SharePoint document library.
The value from the xml document is also visible in the column of the list.

Part 4: Post document to SharePoint site using BizTalk
In Part 1 and 2, we explained the installation and configuration. In Part 3, we explained on how to create the default SharePoint site and a sub-site which is used for all BizTalk’s activity, setup permission for BizTalk server to access the created SharePoint site.
Here is an example showing BizTalk pick-up a file from a local drive and post it to a SharePoint site which we created in Part 3.
First step is to create a document library in SharePoint.
1. Open the BizTalkHome site (default SharePoint site for BizTalk’s activity) which was created in Part 3.
2. Click on Add lists, libraries and other apps icon on the homepage.
3. Click on Document library.
4. Click on the Advanced Options.
5. Enter Name (for example, “testlibrary“), Description and select None from the Document Template.
6. Click Create.
7. Click on the newly created document library on the left pane, for example testlibrary.

8. Open BizTalk Server Administration.
9. Go to an application (if there is no application exist, create a new one).
10. Create a new send port on the selected application.
11. Select Windows SharePoint Services from the Type list.
12. Select PassThruTransmit in the Send pipeline.

13. Click on Configure button next to the Type list.
| Property | Value | Remark |
| Adapter Web Service Port | 81 | The port # that hosted the SharePoint site. |
| Use Client OM | Yes | Only 2013 and above has this value. |
| Destination Folder URL | Testlibrary | The name of the document library created |
| Filename | %MessageID%.xml |
Filename |
| Overwrite | No | |
| SharePoint site URL | http://<server name>:<port#>/sites/btshome/ |
Url of the document library that created in the last step. |
| Note: If BizTalk receive error message 404, check the IIS log of the SharePoint site for more information. It can be access/security issue while trying to post document to the site. Always check the IIS log for any issue related to the SharePoint site |
14. Create a FILE receive port.
| Property | Value |
| Type | FILE |
| URI | C:\temp\*.* |
| Receive handler | BizTalkServerApplication |
| Receive pipeline | PassThruReceive |
15. Enter the name of this newly created receive port into the filter option of the send port that created in the previous steps.
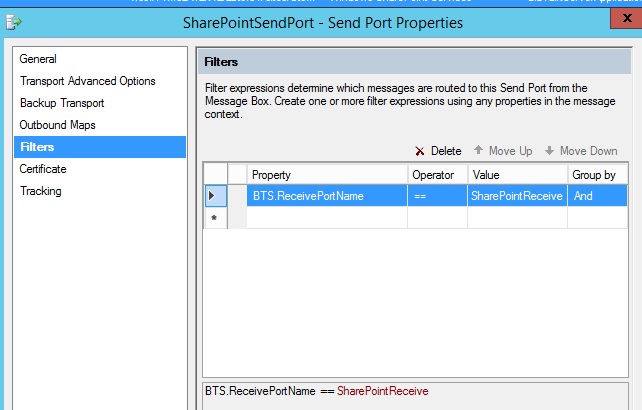
16. Drop a test file into the location specified in the receive location.
17. Verify the document library in the SharePoint site and now the test file is showing on the list.

If the systems are setup correct, the document will be appearing in the SharePoint site.
In Part 5, we will explained on how to use BizTalk’s orchestration to post an xml file to a SharePoint site. The values of the xml file will be promoted/visible in the column of the document list.
Part 3: Create SharePoint sites
In Part 1 and Part 2, we explained on how to install and configure. Now, we will explains on how to create the default SharePoint site and a sub-site. Usually, I created a SharePoint’s sub-site which specially for the BizTalk’s activities.
Create Web Application
In SharePoint, it is required first to create a web application before creating a default site. Here, we are going to follow the steps described below to create the first/default web application for the SharePoint.
1. Click on SharePoint 2013 Central Administration and select Run as Administrator.
2. Click on Manage web application in the Application Management.
3. Click on New on the ribbon bar to create the new web application.
| Note: In this example, we are going to create the SharePoint on port 81 instead of 80. I reserved port 80 in my machine for other web service. |
4. In Create New Web Application, choose Create a new IIS web site and enter SharePoint default site to the name field of the IIS Web site section.
5. In the Port section, enter 81 (for this example).
6. In the Security Configuration section, leave the default settings as they are. Set Allow Anonymous to NO, leave Use Secure Sockets Layer (SSL) to default NO.
7. In the Claim Authentication Types section, check the option Enable Windows Authentication, check the option Integrated Windows authentication and select NTLM.
8. In the Public URL section , enter http://<server name>:<port#> (if using port 80, then leave the port # out) as the URL and then select Default in the Zone.
9. In the Application Pool section, select Create New application pool.
10. Enter the application pool name, call SharePointDefaultAppPool(for example).
11. In the Select a security account for this application pool, select Configurable and click on Register new managed account, enter <domain>\LocalSvcWSSAdmin (for example) – a service account for running the application pool in IIS.
12. In the Database Name and Authentication, enter the database server name and database name.
- Database server:
<database server name> - Database name:
WSS_Content(for example) - Database authentication:
Select Windows authentication (recommend).
13. Click OK to create the first web application.
Result:
- In the Web Application page, the newly created web application appears in the list if it has been created successfully.
- In SQL Server, the
WSS_Contentdatabase is created. - In the IIS Manager, the
SharePoint default sitespecified in step 4 is created. - In the Application pool of the IIS manager, the application pool specified in step 10 is created.

Create first site collection
The web application is now created, we will carry on with creating the first or default site for SharePoint. It is a must to do so in this order because the site used for BizTalk is a sub-site. This default site is serving as a root site.
1. Go back to the Central Administration main page.
2. Click on Create site collection in the Application Manager.
3. In the Web Application, select http://<server name>:port#/ from the Web Application list.
4. Enter the DefaultWebSite in the Title column.
5. In the URL column of the Web Site Address, select “/” (the 1st default site must NOT be “/sites/“) and leave the other column empty.
6. In the Template selection, select Team Site from the list in the Collaboration tab.
7. In the Primary Site Collection Administrator, select an administrator in the User name column and select a 2nd person in the Secondary Site Collection Administrator.
8. Click OK to proceed.
A confirmation screen appears with a clickable url when the site collection has been created successfully. The site will be open in a browser when it is being clicked.

1. When the new site is open in a browser.
2. Go to the Site Settings of the DefaultWebSite
3. Click on People and groups in the Users and Permissions group.
4. Click on New and select Add User.
5. Enter LocalSvcInstanceHost (service account for the BizTalk host) and the LocalWSSAdmin (service account for the app pool).
Create sub-site (default site for BizTalk’s activity)
1. Go to Central Administration, click on Create site collection in the Application Management.
2. Select the web application, http://<server name>:<port#>
3. Enter BizTalkDefaultSite in the Title column.
4. Select “/sites/” from the dialog box right after the server name and enter btshome in the empty column next to the “/sites/“.
5. Select Team site from the list of the Collaboration tab.
6. Enter the primary administrator username.
7. Click OK to create.
8. Open the new site on the browser.
9. Go to Site Settings, select People and groups in the Users and Permission category.
10. Add the service account of the BizTalk host user and the service account of the app pool of the SharePoint site into the BizTalkHomeSite Members with Editor rights.

To verify the site information:
1. Go to Central Administration, click on Application Management.
2. Click on View all site collections in the Site Collections.

Now, the site is ready and we will explain on how to perform the 1st test between BizTalk and SharePoint.
Part 2: Configure SharePoint Foundation 2013
In Part 1 explains the installation and now we proceed with configuration.
1. Click on SharePoint 2013 Products Configuration Wizard and select Run as Administrator.
2. In the SharePoint Configuration Wizard, click Next and then click Yes when a dialog box appear.
3. Select Create a new server farm and then click Next.
4. Enter the SQL server name where the databases will be hosted, database name of the SharePoint Configuration, service account for the accessing the database (it must be a domain account), then click Next.
- database server: <server name>
- database name: SharePoint_Config
- username: <domain>\<username>
- password: <password>
5. In the Specify Farm Security Settings, enter Passphrase and re-enter for confirmation. Click Next.
6. In the Configure SharePoint Central Administration Web Application, un-check option Specify port number. Select NTLM and then click Next.
7. When the configuration is completed, click Finish.
Skip creating your first web application via the wizard by selecting Cancel button.
| Important notes: A SharePoint default web site must be created before creating other site like “/sites/…” otherwise the interface will have security access issue because SharePoint always first access the root site before accessing the sub-site. |
Setup Farm Administrators Group
1. Open SharePoint 2013 Central Administration by select Run as Administrator.
2. Click on Manage the farm administrators group under the Security.

3. Click on New and then select Add User.

4. Enter the user that you want to add and then click on Share button to save it.
Configure Service Pack
1. Click on SharePoint 2013 Products Configuration Wizard and select Run as Administrator.
2. Click Next.
3. Verify the information displayed on the pop-up box is ok for you and then click Yes.
4. Verify the Configuration Database server and the database name are correct, then click Next.
5. Click Finish when the configuration is successful.
Part 1: Install SharePoint Foundation 2013
SharePoint is always a grey area for me and I always forgetting on how to configure the way that BizTalk can interface properly with it. So, I decided to put the steps down as a reminder for myself in case I repeat the same mistake again. The documentation about the installation, configuration and interfacing are very lengthy. Therefore, I break them down into different part for easy reading.
This documentation is based on SharePoint Foundation 2013 and BizTalk 2013R2.
- Download SharePoint Foundation 2013 installation from the Microsoft Download Center.
- Download Service Pack 1 for Microsoft SharePoint Foundation 2013 (KB2880551) from download center. Click here to find out more information about this service pack.
1. Double-click on sharepoint.exe to install the software.
2. Click Install software prerequisites.
3. Click Next.
4. Accept the terms and condition, then click Next.
5. Click Finish when the software prerequisites installation completed.
6. Click on Install SharePoint Foundation this time.
7. Accept the terms and condition, then click Next.
8. Select Server Farm.
9. Select Complete from the Server Type, and then click on Install Now.
10. In the Run Configuration Wizard, leave the Run the SharePoint Configuration Wizard now un-check. Click on Close.
Now, the SharePoint is installed but not yet configured. Click Part2 for the configuration.
Installing service pack
1. Download the service pack installation file.
2. Double-click on the SharePoint Foundation 2013 sp1 installation package.
3. Accept the terms and condition, click Continue.
4. Click OK when the installation completion pop-up box displayed.
Check SharePoint versioning
The following steps can only be carry out when the SharePoint site is configured.
1. Open SharePoint Central Administration, click on Manage servers in this farm in the System Settings.

BizTalk’s orchestration open in text view by default in Visual Studio
In my last post, I’ve mentioned about the upgrade. After upgrading, some of the orchestration only open in text view by default instead of the orchestration designer in Visual Studio. In VS2010, I am able to re-open it by choosing Open With – BizTalk Orchestration Designer (Default). I’ve even click on Set as Default button and assumed that it will be open using the designer by default for the next time. Nope, I was WRONG.
In VS2013, it has even more serious problem. It prompted me with Package ‘ODPackage’ has failed to load properly… but I clicked it away (as always). I tried to use the same method as in VS2010 but I can’t find the BizTalk Orchestration Designer (Default) from the list.
I found these solution:
- Close Visual Studio
- Launch the services console with the command: Services.msc. Restart the “Protected Storage” Service (make sure it is in the automatic mode and started).
- Restart IIS with the command : iisreset
- Reset the Visual Studio loaded packages (in a Visual Studio Command Prompt) with the command: devenv.exe /setup /resetskippkgs
from the following sites:
- https://jglisson73.wordpress.com/2010/12/27/biztalk-orchestration-will-not-open-in-the-designer/
- http://geekswithblogs.net/synBoogaloo/archive/2007/04/17/111745.aspx#423642
- https://social.msdn.microsoft.com/Forums/en-US/011b4b7a-7a8c-47d0-b571-70aaca3575af/package-odpackage-has-failed-to-load-properly?forum=biztalkgeneral
First of all, I can’t find the “Protected Storage” service in the Windows 2012R2 server anymore. Secondly, the issue only happening to one or two of the orchestration and not all of them. So, I question myself why do I run those steps. To my opinion, these steps are only apply when the BizTalk design component in visual studio is completely mess up.
When I search further, I stumble to the following site:
http://stackoverflow.com/questions/9381374/biztalk-orchestration-opens-in-text-view-in-visualstudio-orchestration-designer
The solution work perfectly for me and I can open it without any issue in VS2013 and the ODPackage loading failure issue is also disappear.
1.Open the .btproj file using a text editor.
2. Locate the orchestration that having problem opening using the designer mode.
<ItemGroup>
   <XLang Include="Orchestration1.odx">
      <TypeName>Orchestration1</TypeName>
      <Namespace>TestProject.Orchestrations</Namespace>
      <SubType>Designer</SubType>
   </XLang>
</ItemGroup>
<ItemGroup>
   <XLang Include="Orchestration2.odx">
      <TypeName>Orchestration2</TypeName>
      <Namespace>TestProject.Orchestrations</Namespace>
    </XLang>
</ItemGroup>
3. Remove the following tag from the .btproj file.
<SubType>Designer</SubType>
4. Save the .btproj file.
5. Reload the project when it is prompt to do so.
Now, double-click on the orchestration and it should open in the designer mode instead of the text view.
Upgrade BizTalk application 2006/R2 to 2013R2
Lately, I got an assignment to upgrade the BizTalk applications that is running in BizTalk 2006/R2 to 2013R2. A few years ago, I’ve done the same but from 2006/R2 to 2010 and it went fairly easy; only need to fix minor bugs that pop-up during the built. So, I just used the same method and convert it directly from 2006/R2 to 2013R2. Unfortunately, the BizTalk project doesn’t load after converted using the pop-up wizard when opening it with latest visual studio. After some investigation, everyone recommended to do a 2 steps conversion: from 2006/R2 (vs2015) –> 2009 (vs2008) –> 2013R2 (vs2013).
Then I re-called that I’ve done another upgrade lately from 2010 to 2013R2 which went smoothly and doesn’t even need to rebuild the project. This gives me an idea…2010 and 2013R2 is not much different, one is with .net framework 4.0 and the other one is 4.5. I asked myself why don’t I convert it first to 2010 instead of 2009(vs2008) which is more widely available (at least for myself) and then to 2013R2.
Here is what I’ve done, I upgraded my code from 2006/R2 (vs2015) –> 2010 (vs2010) –> 2013R2 (vs2013).
- If you have 2009 (vs2008) and don’t have 2010 (vs2010), you can just follow the steps as what the majority is doing.
- If you’ve 2010 (vs2010) and don’t have 2009 (vs2008), then you can follow my steps.
- If you’ve both, go directly to 2010 (vs2010) and skip 2009 (vs2008) because that is still in .net framework 3.5.
Here is my upgrade steps:
- Copy the BizTalk solutions and projects from 2006/R2 (vs2005) to 2010 (vs2010).
- Delete the
*.btproj.userfile from each project. - Edit
*.btprojfile with notepad, replace any reference path that containsProgram Files\Microsoft BizTalk Server 2006in<HintPath>..\..\..\..\Program Files\Microsoft BizTalk Server 2006\*.dll</HintPath>withProgram Files\Microsoft BizTalk Server 2010. - Click on the solution contains all the BizTalk project(s), and select “Clean Solution” or click on the project and then select “Clean”. This is to remove all the un-wanted and old version of dll files from the project folder.
- Ensure
.NET framework 4is selected in theTarget frameworkof each project properties. - Build each project. If there is any issue during the build, fix it until the build run successful.
- At last, rebuild the complete BizTalk solution until it is successful.
- When the re-build is success in the 2010 (vs2010), copy these source to 2013R2 (vs2013).
- Repeat step 2-7 in the 2013R2 (vs2013).
Voilà! your code is upgraded successfully and you can continue with your next step – TESTING!!!
Using dynamic mapping in orchestration
This project shows on how to receive a single xml file, transform it into two different layout based on a value of an element in the receive file, and send using the same send port.
1. Create a BizTalk project.
2. Create one input schema and two output schemas.

3. Create an orchestration.

| Message/variable | Identifier | Type | Comments |
| Message | MessageIn | DynamicMapping.InputSchema | Incoming message |
| Message | MessageOut | System.xml.xmldocument | Outgoing message |
| Variable | gender | String | Gender information for condition check. |
| Variable | tMap | System.Type | The Mapping value. |
In the extract_Gender Expression shape – get the value of the gender:
gender = xpath(MessageIn,"string(//*[local-name()='Gender'])");
In the DynamicMapping Expression shape – if Male, use mapping B or else use mapping A:
if (gender=="Male")
 { tMap = System.Type.GetType("DynamicMapping.Input_to_OutputB,DynamicMapping, Version=1.0.0.0, Culture=neutral, PublicKeyToken=6b86ed57e8e7a1b2"); }
else
 { tMap = System.Type.GetType("DynamicMapping.Input_to_OutputA,DynamicMapping, Version=1.0.0.0, Culture=neutral, PublicKeyToken=6b86ed57e8e7a1b2"); }
In the Message Assignment shape – transform the message to the selected map:
transform(MessageOut) = tMap(MessageIn);
4. Build and deploy the solution to BizTalk Admin Console.
5. Open the BizTalk Admin Console and navigate to the application where the design has been deployed to.
6. Create a new Send Port for the orchestration.
7. Select PassThruTransmit for the Send Pipeline.
8. Start the orchestration, the associated send and receive ports.
9. Drop sample input file(s) to the location of the receive port.
Sample1.xml:
------------
<ns0:Input xmlns:ns0="http://DynamicMapping.InputSchema">
<Name>Dennis</Name>
<Gender>Male</Gender>
<Age>21</Age>
<Dress></Dress>
<Hair>short</Hair>
<Pant>short</Pant>
<Shirt>short</Shirt>
</ns0:Input>

Sample2.xml:
------------
<Name>Laura</Name>
<Gender>Female</Gender>
<Age>21</Age>
<Dress>long</Dress>
<Hair>short</Hair>
<Pant></Pant>
<Shirt></Shirt>
</ns0:Input>
As you can see that there are 2 output files in the location of the send port. The content of the two xml files are slightly different.
Latest BizTalk Terminator available for download
For anyone who is using BizTalk Terminator, the latest version is now available for download.
